Friday, September 2, 2011

How I changed the height of the foot on the Handi Quilter Sweeet Sixteen Sit Down Model

I used to have a problem quilting a thick quilt sandwich since the foot was so close to the tabletop.  I recently purchased an open toe quilting foot and after changing the foot I now realize how easy it would be to raise or lower the height of the foot as needed. 
Here is a diagram of the parts I used.
Here are the instructions...
1.  First I removed the needle and the needle plate.
2.  While lifting up on the spring loaded presser bar I loosened the jam nut and screwed the hopping foot up or down depending on if I wanted it higher or lower.  
3.  Once I had it where I wanted I used an 8mm wrench to tighten the jam nut.
4.  Finally, I replaced the needle and the needleplate and Voila it was done!

Machine Quilting on the Handi Quilter Sweet Sixteen: Some interesting facts...


I've been quilting on my Handi Qtuilter Sweet Sixteen. Some things I have found...
  1. It would be nice if the machine had a warning beep that the bobbin is finishing. As it is now it will sometimes make a loud clanking noise coming from the bobbin area when it get to the end of the bobbin thread.  I used to think something was really wrong but soon came to realize my bobbin had ended but not before the final stitches were pulled and tugged at the last thread ended.  Having a warning beep would cause me to stop before the ending thread bunches up.
  2. I keep the lint brush in the cubicle next to the bobbin so that it is always handy for me to clean out the bobbin area each time I change the bobbin. 
  3. Every time I insert another bobbin I check the tension by lifting the bobbin out of the palm of my hand (pg. 14 in the manual).  It seems as though each bobbin is not wound exactly the same so each bobbin may need a slight adjustment.  In addition I practice on a scrap before starting again on my quilt.
  4. I purchased an open toe foot for my Handi Quilter.  It was so easy to change!  
  5. I purchased the Supreme Slider but sometimes I don't need it since the tabletop of the Handi Quilter is so smooth.
  6. Always practice your quilting design before doing the actual quilting on your project.
  7. Pin baste your quilt on the side you will be quilting from that way they are easy to remove as you quilt.  I prefer to machine quilt from the side of the that has less of a pattern/design.  

Thursday, September 1, 2011

A baby shower present for my new nephew, Kaleb...

Here is a project I just finished for my neice who just had her son, Kaleb. It is a blanket made of minkie and flannel on the back.  With the scraps I made a snuggle blankie, made of minkie and satin on the back.  Except for the fact that the minkie created a ton of lint, I really enjoyed making this!
Here is a close up of the front of the blanket...

Here is a close up of the free motion quilting on the back...

Here is a close up of the snuggle blanket...  I added strips with velcro to hand the toys from...


Sunday, April 17, 2011

My first quilt on the Handi Quilter

   Well I used my Handi Quilter to make a blanket.  I purchased several fabrics from Joann's clearance section and put together several "quilt sandwiches".  I basted my first quilt sandwich (approx 42" X 42") using safety pins.  I had to press it before quilting since I had it sitting on my shelf and it got wrinkled.  

   I did a stippling design meandering from the center out. 


   I used  Coats & Clark Star Machine Quilting100% cotton thread size 50.  I used approximately 3 bobbins, winding each was relatively easy with the Handi Quilter bobbin winder.  I did have a problem winding one bobbin but realized I did not have the thread in the tension disc and once I did this it wound without a problem.  
   I cleaned out the bobbin and case with the brush each time I replaced the bobbin, lots of lint, and placed a drop of oil on the hook where the bobbin basket and the hook meet (page 15 in the user manual).  I did not have any oil come up onto my fabric.
   I did notice when I got to the end of a bobbin I started getting some looping of my threads.  As soon as the bobbin was changed the problem was solved.  This meant I had to pull out these threads and tie them off before resuming my stippling.  To tie off my threads I threaded a sewing needle with the thread tail and inserted them into the batting, thus hiding them.
   As I moved the quilt sandwich it did slip over the edges on the right and left.  As you can see in the picture I have ironing boards on both sides to catch the fabric. My DH darling husband has a plan to add strips to each side of the table to keep the fabric on the table without the use of the ironing boards.  
  Well, that's all for now! :)


Friday, March 25, 2011

My thoughts on using my Handi Quilter for the first time.

I would like to tell you about using my Sweet Sixteen for the first time.  First I practiced on some small blocks of quilt sandwiches to find a sewing speed that would give me the stitch length I wanted.  Then I sewed my first quilt, here are my first impressions...


  • I felt it was easier to adjust the "fabric sandwich" as quilted due to the large work area, left, right, front and back as compared to my DSM domestic sewing machine.  The fabric laid so flat.

  • Sewing on my DSM for so many years I had to remember to press the foot pedal all the way down and keep it that way.  I was tempted to pick my foot off the pedal to go slower but realized if I wanted to go slower I would move the fabric slower.  
  • When you take your foot off the pedal wait for the needle to drop down.  Don't take you hands off the fabric when you take your foot off the pedal.  Doing this causes the fabric to shift slightly since the needle has not dropped down yet and then your next stitch is not in line.
  • Keep the fabric moving at a consistent speed.  I had a tendency to move the fabric faster in order to get to a desired area.  I also wanted to go faster on curves.  
  • Don't look at the needle which moves faster than how the fabric.
  • Clean the bobbin case when you use a new bobbin and clean the needle area frequently as it builds up lint. 
  • When free motion quilting on my DSM changing the bobbin was tedious because I had to remove the fabric completely to get to the bobbin.  Now changing the bobbin is easy since the bobbin is located below the table.
  • One criticism...I notice the quilt sandwich made with warm and natural,  fits under the foot but if I have a high loft batting I think I might have some trouble getting it under the foot. 


Overall, using the Handi Quilter versus free motion quilting on my DSM was faster, easier, more comfortable, and convenient...  

How I prepared my quilts for quilting on the Handi Quilter Sweet Sixteen

Hi, I would like to tell you how I prepared my quilts for quilting on my new Sweet Sixteen sit-down system. First I went to Joann's and purchased several clearance fabrics.  Then I pre-washed them following the instructions on the Leah Day website,  http://www.daystyledesigns.com/howtoprewashfabric.htm  
There are those who believe you should prewash all fabrics and those who feel you don't have to prewash.  I have done both and since prewashing using the above method I think I prefer to do this if I can.  The fabrics smell fresh and the starching makes them crisp.

After prewashing I then made several quilt sandwiches using different basting methods.  
1.  I used a hand basting method by Sharon Schamber, her video is on youtube.  
2.  Another method I used was spray basting.
3.  I also used the popular pin basting method. 
As I sew through these quilts I will give my opinions of using these three methods. 

Thursday, March 17, 2011

MY HANDI QUILTER...:)

Yesterday was the big day...Richard from Quilter's Cocoon, Riverside came to my home and set up my sit-down quilting machine.  He sat with me and explained everything about the machine in detail.  He had me practice on a quilt sandwich to find my ideal quilting speed.  What great service!  I can see why he  just won the customer service award for the entire area.  


Here's the picture of my new toy...

In anticipation of getting my sweet sixteen I have prepared several projects ready to be quilted.  Do you notice the deep 16" of throat space?  It has lots of lighting, lots of space for quilting.  I'll post again as I use this ....Rose


Tuesday, March 15, 2011

Black & White Quilt

This is the front and back of the 3rd quilt I've ever made.  I made for my daughter, Alexis.  I purchased black/white fat quarters from various quilt stores on the 2009 Quilt Run.  I didn't start it for a while (kinda intimidated, but my sewing teacher, Georgianne Beebe, always says, "no guts, no glory" which inspired me to start it.  I finished it Xmas 2010.  :)  It's a combination of Paper piecing and blocks from  Electric Quilt, Electric Quilt is a quilting software program.  The blocks were put together using a "reversible technique" and the quilting was done on my DSM domestic sewing machine.  It measures 108" X 88"!! There is one block on the back - a special gift of dalmations from my sewing sister - Christine.  She wanted to honor Alexis' dad's occupation, firefighter.  She searched for a year for this fabric for Alexis's quilt good timing since it took me that long to start it.  It has 21 blocks to honor Alexis turning 21 this in 2010.  It also has blocks to represent sewing for her mom, a white rabbit which died in 2010, soccer, music, and other facets of her life.  I hope you like this...

What this blog is about..


Welcome, thanks for stopping by!  This is my very first blog entry…

I plan to post information about sewing.  I love to sew…I’m always thinking about the sewing projects I am working on…I sew almost every day… I can’t sew every day because I have to do things like housework, laundry, pay bills, blah, blah, blah. 

I plan to post information about my sewing life.  I will also tell you about sewing with kids.  I have a monthly sewing class I teach.  It started with my nieces and nephew, Victoria, Julianna and Diego.  Today we have about 6-12 family members sewing.  It sure is fun.  I will let you know what we’re working on and post some pictures of my beautiful family. I will also include photos of my past projects and let you know what I am working on. 

I live in Temecula and I go to a stimulating sewing class every Tuesday, (Tuesday is heirloom sewing, more about this later).  I also attend a group in De Luz called the “We’re in Stitches group.”  They are a wonderful group of ladies.

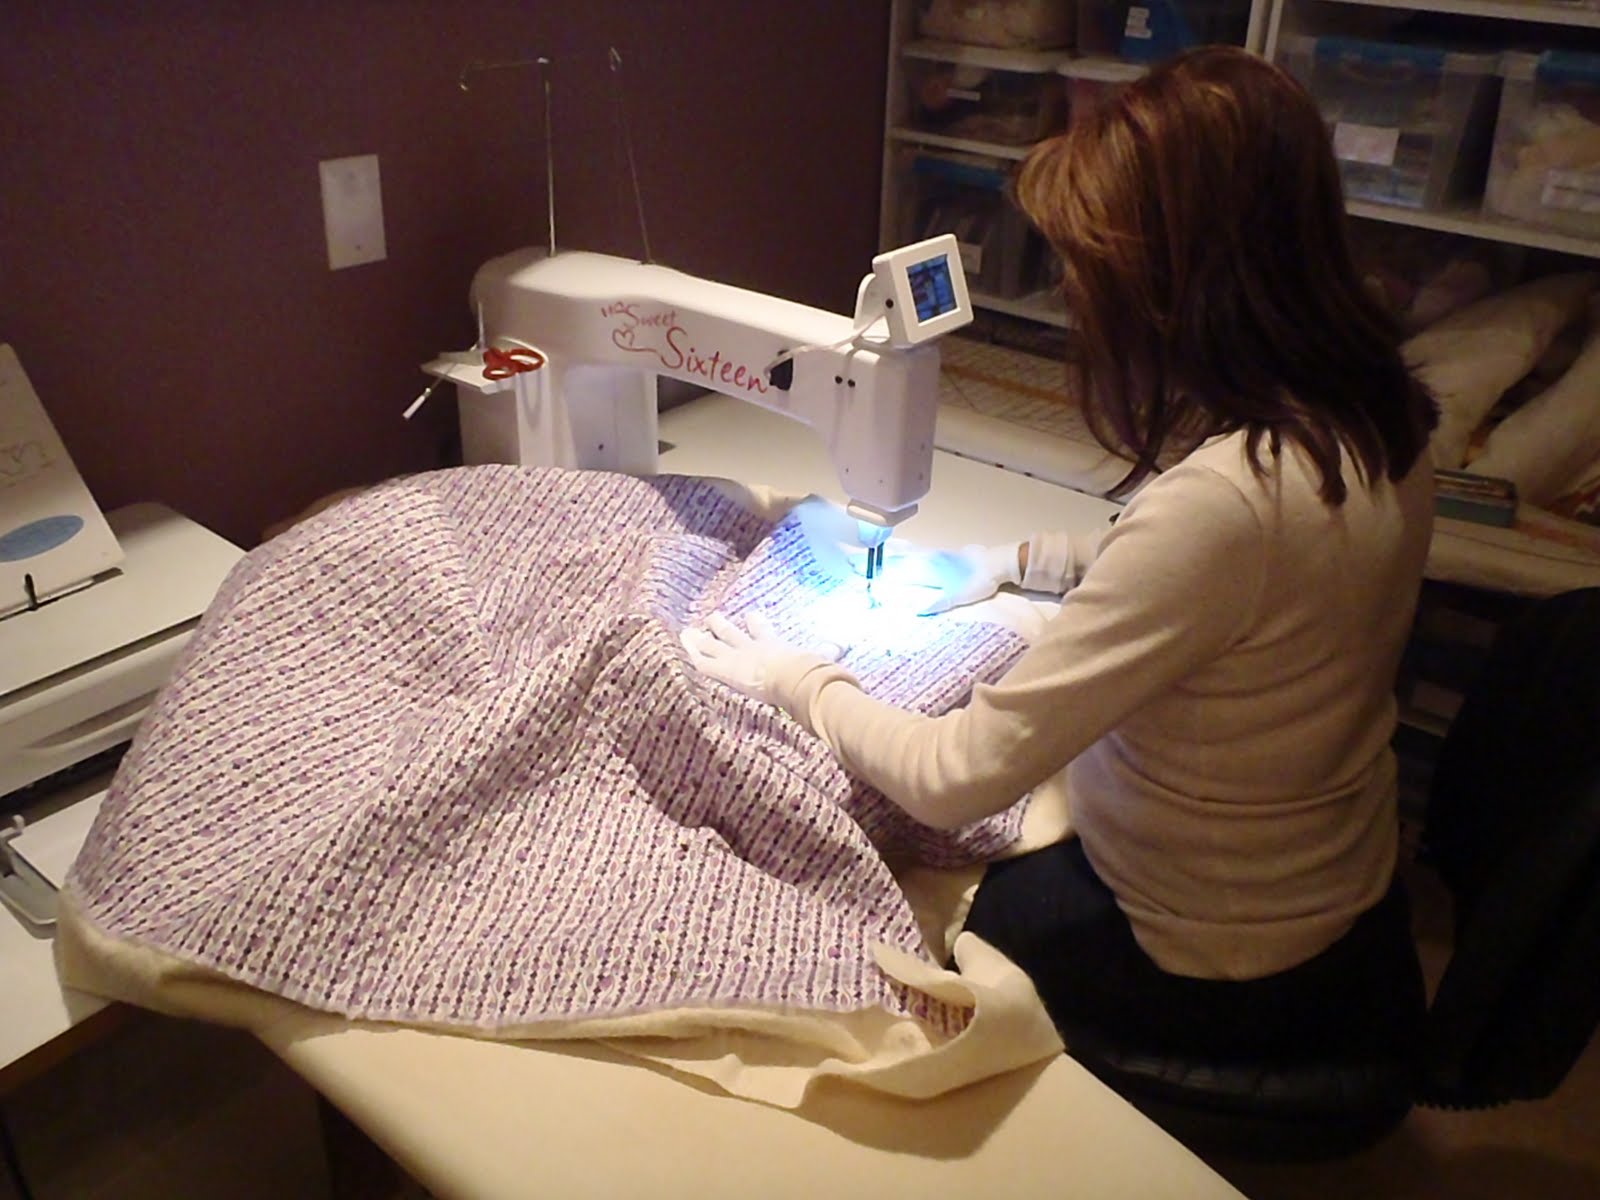
My DH, darling husband just bought me a longarm sit-down quilting machine!  I am so excited! It is a Handi Quilter Sweet Sixteen.  I have learned there are two parts in making a quilt...the construction (piecing) of it and the quilting (putting the 3 layers, a quilt sandwich, together, the top, the batting and the backing.) My Handi Quilter is a specialized machine that will do the quilting.  You sew the quilt on this machine using your hands to move the quilt to the needle.  It will be a challenge to master this machine, I will inform you of my journey.  I will be getting my machine set up tomorrow, that's my next blog.

That’s about all for now,  stay tuned to my blog…I have lots of exciting things to tell you…Sew long…Rose Valdillez.